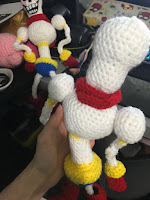
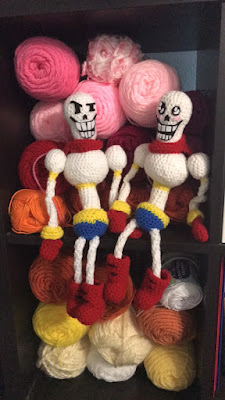
I may be a bit behind the ball on this one, but I finally finished my (first) play through of Undertale! I've had quite a few custom orders for patterns based on the game, and I just had to figure out what all the fuss was about. It was pretty epic, if I do say so myself. And who doesn't love Papyrus? I had to make a crochet doll of him!
He's about 14.5" tall when finished. Leave tails on all pieces for sewing together! You can always trim tails if you leave too many, but it's a pain in my opinion to add them in later.
Crochet Terms
MR- Magic Ring
SC - Single crochet
INC - Increase
DEC - Decrease
PC - Popcorn Stitch
F/O - Finish off
Sl St - Slip Stitch
DC - Double Crochet
Number in "( )" at the end of each line is the total number of stitches that should be on that row
Materials
3mm crochet hook
Worsted weight yarn (I used Red Heart Super Saver) in white, yellow, blue, black and red
Stuffing (poly-fil)
Tapestry/yarn needle
Scissors
Felt/felt glue for face (optional - can also needle felt)
Head (make one, stuff as you go, WHITE)
- MR 6 (6)
- INC in each SC (12)
- SC 1, INC (18)
- SC 2, INC (24)
- SC 24
- SC 24
- SC 24
- SC 24
- SC 24
- SC 2, DEC (18)
- SC 18
- SC 18
- SC 18
- SC 18
- SC 18
- SC 18
- SC 1, DEC (12)
- DEC (6)
- F/O
- MR 6 (6)
- INC in each SC (12)
- SC 3, INC 3, SC 3, INC 3 (18)
- SC 5, INC 4, SC 2, INC, SC 3, INC 4 (24)
- SC 24
- SC 3, INC (30)
- SC 30
- SC 4, INC (36)
- SC 36
- SC 36
- SC 4, DEC (30)
- SC 30
- SC 3, DEC (24)
- SC 24
- SC 2, DEC (18)
- SC 1, DEC (12) ***CHANGE TO YELLOW***
- SC 12
- SC 12 ***CHANGE TO WHITE***
- SC 12
- SC 12
- SC 12
- SC 12
- SC 12
- SC 12
- SC 12
- F/O
- MR 4 (4)
- INC in each SC (8)
- SC 1, INC (12)
- SC 2, INC (16)
- SC 16
- SC 16
- SC 16
- SC 2, DEC (12)
- SC 1, DEC (8) ***CHANGE TO YELLOW***
- DEC (4)
- SC 4 ***CHANGE TO WHITE***
- SC 4
- SC 4
- SC 4
- SC 4
- F/O
- CH 23, turn
- SC 22
- F/O by securing top to bottom by folding in half
- MR 5 (5)
- INC in each SC (10)
- SC 10
- SC 10
- SC 3, DEC, SC 3, DEC (8)
- PC, SC 7 (8)
- SC 8 ***CHANGE TO YELLOW***
- SC 8
- SC 8
- SC 8
- SC 1, INC (12)
- SC 1, INC (18)
- F/O
Bottom (make one! the bottom is made from one circle sewn to one half sphere, so two parts. Begin with the half sphere - start with blue yarn!)
- MR 5
- INC in each SC (10)
- SC 1, INC (15)
- SC 2, INC (20)
- SC 3, INC (25)
- SC 25
- SC 25 ***CHANGE TO YELLOW***
- SC 25
- SC 25
- SL ST to F/O
part two of bottom - yellow yarn
- MR 5
- INC in each SC (10)
- SC 1, INC (15)
- SC 2, INC (20)
- SC 3, INC (25)
- F/O
Sew the yellow circle to the open half of the sphere, stuffing as you sew it shut.
Boots (boots are made from two pieces each. Make two of each piece. Use red yarn! Stuff the first piece below, there is not any stuffing in the "cuff" of the boot- the second piece. It is open.)
- MR 5 (5)
- INC in each SC (10)
- SC 1, INC (15)
- SC 15
- SC 15
- SC 15
- SC 15
- SC 15
- SC 15
- SC 1, DEC (10)
- DEC (5)
- F/O
part two of boot - use red yarn. DO NOT stuff - this is an open piece.
- CH 15, SL ST to first CH to make a circle.
- SC 15
- SC 15
- SC 15
- SC 15
- SC 15
- SL ST to F/O
sew the upper cuff to the lower stuffed shoe, off center, to make a boot.
- MR 4 (4)
- SC 4
- SC 4
- SC 4
- SC 4
- SC 4
- SC 4
- SC 4
- SC 4
- SC 4
- SC 4
- SC 4
- SC 4
- SC 4
- SC 4
- SC 4
- F/O
Cape (make one, red yarn! You will be working in rows for this, not in a circle. CH 1 and turn at the end of each row)
- SC 40
- SC 25
- SC 10
- SC 10
- SC 10
- SC 10
- DEC, SC 6, DEC (8)
- SC 8
- SC 8
- DEC, SC 4, DEC (6)
- SC 6
- DEC, SC 2, DEC (4)
- SC 4
- DEC, DEC (2)
- SC 2
- DEC (1) ***At this point, you will NOT turn. Continue down the side of the triangle, to the side of the cape that only has on row on the cape tie - not the side with the thicker tie)
- SC down side (should be about 14 SC)
- SC 15 to thicken the "cape tie" and make it the same thickness as the other side
- F/O
Assembly
For the hands and arms: Take the forearm, and place the end without the tail down into the cuff of the glove. I try to place it all the way down to where the yellow and red meet. Take a bit of yellow scrap yarn and sew it into place. Then you can fold the cuff of the glove down.
Next, take the shoulder piece, and sew the forearm top to the bottom of the upper arm. You don't want these to overlap at all. You want to do more of a whip stitch with them side by side to make a "joint" so his arm can bend.
For the boots and legs: You should have previously sewn the boot cuff to the bottom of the boot, if not do it now as stated in the "boot" section above. Now you can take a leg, and place the leg inside the boot as far as you can. I place the end without a tail inside the boot, so I can sew the leg to the bottom later. Using some black scrap yarn, sew two stitches to look like laces on the front of the boot "cuff", using these two stitches to hold the leg into the shoe.
Next, I usually sew the legs to the bottom before attaching them to the main body to make it a bit easier to handle. The legs should go on either side of the rounded half sphere, on the bottom. Once those are attached, sew the abdomen to the very middle of his bottom on the flat side
Next, I usually sew the legs to the bottom before attaching them to the main body to make it a bit easier to handle. The legs should go on either side of the rounded half sphere, on the bottom. Once those are attached, sew the abdomen to the very middle of his bottom on the flat side
For the body: Sew the shoulders on either side of the body. The body should have an oval shape, make sure the shoulders are on the narrow part of the oval, so the long side is his front and back. .
For the head and cape: Papyrus's head should go, of course, on top of his body. I usually place the head a little farther forward instead of in the direct middle. The cape is where it can be a little tricky. I center the back of the cape behind Papyrus' head on his back, and wrap one side of the cape tie around his neck and stitch it into place. Then, I take the other tie, wrap it around and fold it under the other side and tack it down with a few stitches.
Lastly, his face! You can needle felt it on, but I just used the regular craft felt I had lying around and some glue. I just eyeballed it off a few Papyrus photos I found online.
And you're done! I made both a "regular" and "flirty" Papryus face - I'm in love with them!! Have fun making your own Papyrus!
This pattern is for personal use only, and is a fan made creation - not an officially licensed pattern.


i love your pattern I made it for my best friend! have you made a sans pattern? hope to see your next pattern soon!
ReplyDeleteThanks!
ReplyDelete