Thursday, August 30, 2018

Mini Squirtle Squad Crochet Pattern


I haven't been crocheting so much lately, I've actually been on a cross stitching kick - but during Squirtle community day I had to make a pattern!  I've got it pretty much perfected (I think!).  I forewent safety eyes on this one, and instead used stiff felt and felt glue to make him those classic Squirtle Squad sunglasses!  I had to make Ash's squirtle, of course, because his glasses are way cooler than the round ones.  You can make whatever shape glasses you'd like, as well as use safety eyes instead!  

Materials

White felt
Stiff black felt
Felt glue
Scissors
Poly-fil or other soft toy stuffing
Yarn needle
3 mm crochet hook
Brown yarn*
Cream yarn*
White yarn*
Sky blue yarn*


*These colors are for a regular squirtle.  For shiny squirtle you will need green, very light blue, white and cream yarn.  All yarn used was Red Heart brand, worsted weight.

Crochet Terms

MR- Magic Ring
SC - Single crochet
INC - Increase
DEC - Decrease
PC - Popcorn Stitch
F/O - Finish off
Sl St - Slip Stitch
DC - Double Crochet
FLO - Front loops only
Number in "( )" at the end of each line is the total number of stitches that should be on that row

Work this pattern in ROUNDS.

Head (in BLUE yarn)

Row 1: Magic Ring 6 (6)
Row 2: *INC* 6 times (12)
Row 3: *SC, INC* 6 times (18)
Row 4: *SC, SC, INC* 6 times (24)
Row 5: 24 SC (24)
Row 6: 24 SC (24)
Row 7: 24 SC (24)
Row 8: *SC, SC, DEC* six times (18)
Row 9: *SC, DEC* 6 times (12)

Finish off leaving sphere open, with a tail to sew the head to the body later.

Arms (in BLUE yarn)

Row 1: MR 4 (4)
Row 2: SC, INC, SC, INC (6)
Row 3: SC 6 (6)

Finish off, leaving a tail for sewing later.  Make two arms.

Feet (in BLUE yarn)

Row 1: MR 4 (4)
Row 2: *INC* 4 times (8)
Row 3: *SC, INC* 4 times (12)
Row 4: SC 12 (12)
Row 5: *SC, DEC* 4 times (8)

Finish off, leaving a tail for sewing later.  Make two feet.

Shell (in BROWN yarn *GREEN if shiny*)

Row 1: MR 5 (5)
Row 2: *INC* 5 times (10)
Row 3: SC 10 (10)

Switch to WHITE yarn

Row 4: Work in FLO *SC, INC* 5 times (15)
Row 5: *SC, SC, INC* 5 times (20)

Finish off, leaving a tail for sewing later.


Tail (in BLUE yarn)

Row 1: MR 6 (6)
Row 2: *INC* 6 times (12)
Row 3: *SC, INC* 6 times (18)
Row 4: SC 18 (18)
Row 5: SC 18 (18)
Row 6: SC 18 (18)
Row 7: *SC, DEC* 6 times (12)
Row 8: SC 12 (12)
Row 9: SC 12 (12)
Row 10: SC 12 (12)
Row 11: SC 12 (12)
Row 12: SC 12 (12)
Row 13: SC 12 (12)
Row 14: SC 12 (12)

Finish off, leaving a tail for sewing later.

Body (in CREAM yarn)

Row 1: MR 6 (6)
Row 2: *INC* 6 times (12)
Row 3: *SC, INC* 6 times (18)
Row 4: *SC, SC, INC* 6 times (24)
Row 5: SC 24 (24)
Row 6: SC 24 (24)
Row 7: SC 24 (24)
Row 8: *SC, SC, DEC* 6 times (18)
Row 9: SC 18 (18)
Row 10: *SC, DEC* 6 times (12)
Row 11: SC 12 (12)

Finish off


Assembly

Stuff both the head and body firmly (but not overstuffed!).  Use the tail of yarn you left on the head to sew the head to the body.  


Take the shell and use the tail of yarn on the shell to sew it to the body.  Use a bit of stuffing to fluff up the shell middle before sewing it completely closed.  I place the shell top a row or two below the neck, and make the bottom of the shell almost even with the bottom of the body.


Next, sew on the legs and arms.  I place the arms 3-4 rows down from the neck, and the top of the legs 7-8 rows below the neck.  Just sew them wherever it looks right!


Before you sew the tail to the body, you have to tack it into place to make the swirl.  Stuff the end ball of the tail lightly, but not the shaft of the tail.  Leave that empty. Take a bit of matching blue yarn and tack the ball of the tail to the shaft.  I usually place my tack in the second or third row down of the tail, and roll it down the shaft to a place it looks right.  It should look like the photo above with a straight length left on the tail.  Once the tail is tacked into place for the swirl (sometimes I tack in two or three places to make sure it stays), sew the end of the tail to the back of the squirtle under the shell.  


For the glasses, use the black stiff felt to cut out whatever shape glasses you want.  To add the reflection, cut out strips or triangles of white felt and use felt glue to glue it on.  I let it dry with the strips too large, then trim them down.  Use felt glue or black thread to attach the glasses to your squirtle.  

Voila! Squirtle! 


Friday, February 24, 2017

Papyrus Crochet Pattern!!


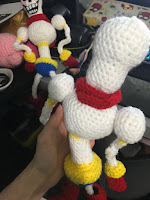
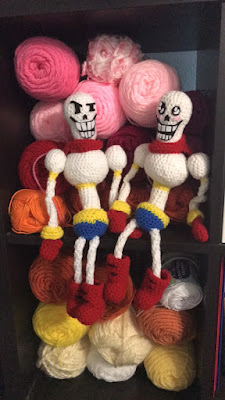
I may be a bit behind the ball on this one, but I finally finished my (first) play through of Undertale! I've had quite a few custom orders for patterns based on the game, and I just had to figure out what all the fuss was about. It was pretty epic, if I do say so myself. And who doesn't love Papyrus? I had to make a crochet doll of him!

He's about 14.5" tall when finished.  Leave tails on all pieces for sewing together!  You can always trim tails if you leave too many, but it's a pain in my opinion to add them in later.

Crochet Terms

MR- Magic Ring
SC - Single crochet
INC - Increase
DEC - Decrease
PC - Popcorn Stitch
F/O - Finish off
Sl St - Slip Stitch
DC - Double Crochet
Number in "( )" at the end of each line is the total number of stitches that should be on that row

Materials

3mm crochet hook
Worsted weight yarn (I used Red Heart Super Saver) in white, yellow, blue, black and red
Stuffing (poly-fil)
Tapestry/yarn needle
Scissors
Felt/felt glue for face (optional - can also needle felt)

Head (make one, stuff as you go, WHITE)


  1.  MR 6 (6)
  2.  INC in each SC (12)
  3. SC 1, INC (18)
  4. SC 2, INC (24)
  5. SC 24
  6. SC 24
  7. SC 24
  8. SC 24
  9. SC 24
  10. SC 2, DEC (18)
  11. SC 18
  12. SC 18
  13. SC 18
  14. SC 18
  15. SC 18
  16. SC 18
  17. SC 1, DEC (12)
  18. DEC (6)
  19. F/O 

Body (make one, stuff as you go! start with WHITE)


  1. MR 6 (6)
  2. INC in each SC (12)
  3. SC 3, INC 3, SC 3, INC 3 (18)
  4. SC 5, INC 4, SC 2, INC, SC 3, INC 4 (24)
  5. SC 24
  6. SC 3, INC (30)
  7. SC 30
  8. SC 4, INC (36)
  9. SC 36
  10. SC 36
  11. SC 4, DEC (30)
  12. SC 30
  13. SC 3, DEC (24)
  14. SC 24
  15. SC 2, DEC (18)
  16. SC 1, DEC (12) ***CHANGE TO YELLOW***
  17. SC 12
  18. SC 12 ***CHANGE TO WHITE***
  19. SC 12
  20. SC 12
  21. SC 12
  22. SC 12
  23. SC 12
  24. SC 12
  25. SC 12
  26. F/O

Shoulders (make TWO! start with white, stuff only the ball at the top of the shoulder, not the arm!)


  1. MR 4 (4)
  2. INC in each SC (8)
  3. SC 1, INC (12)
  4. SC 2, INC (16)
  5. SC 16
  6. SC 16
  7. SC 16
  8. SC 2, DEC (12)
  9. SC 1, DEC (8) ***CHANGE TO YELLOW***
  10. DEC (4) 
  11. SC 4 ***CHANGE TO WHITE***
  12. SC 4
  13. SC 4
  14. SC 4
  15. SC 4
  16. F/O

Forearms (make TWO! White yarn, no stuffing)


  1. CH 23, turn
  2. SC 22
  3. F/O by securing top to bottom by folding in half 


Hands (make TWO! Start with red yarn, stuffing the glove is optional - I did not.  Photo is of glove with arm attached - I missed taking a picture of the glove alone!)


  1. MR 5 (5)
  2. INC in each SC (10)
  3. SC 10
  4. SC 10
  5. SC 3, DEC, SC 3, DEC (8)
  6. PC, SC 7 (8)
  7. SC 8 ***CHANGE TO YELLOW***
  8. SC 8
  9. SC 8
  10. SC 8
  11. SC 1, INC (12)
  12. SC 1, INC (18) 
  13. F/O


Bottom (make one! the bottom is made from one circle sewn to one half sphere, so two parts. Begin with the half sphere - start with blue yarn!)
  1. MR 5
  2. INC in each SC (10)
  3. SC 1, INC (15)
  4. SC 2, INC (20)
  5. SC 3, INC (25)
  6. SC 25
  7. SC 25 ***CHANGE TO YELLOW***
  8. SC 25
  9. SC 25
  10.  SL ST to F/O
part two of bottom - yellow yarn
  1. MR 5
  2. INC in each SC (10)
  3. SC 1, INC (15)
  4. SC 2, INC (20)
  5. SC 3, INC (25)
  6. F/O
Sew the yellow circle to the open half of the sphere, stuffing as you sew it shut.  


Boots (boots are made from two pieces each.  Make two of each piece.  Use red yarn! Stuff the first piece below, there is not any stuffing in the "cuff" of the boot- the second piece.  It is open.)


  1. MR 5 (5)
  2. INC in each SC (10)
  3. SC 1, INC (15)
  4. SC 15
  5. SC 15
  6. SC 15
  7. SC 15
  8. SC 15
  9. SC 15
  10. SC 1, DEC (10)
  11. DEC (5)
  12. F/O
part two of boot - use red yarn.  DO NOT stuff - this is an open piece.
  1. CH 15, SL ST to first CH to make a circle.
  2. SC 15
  3. SC 15
  4. SC 15
  5. SC 15
  6. SC 15
  7. SL ST to F/O
sew the upper cuff to the lower stuffed shoe, off center, to make a boot.

Legs (make TWO! Use white yarn, and do NOT stuff)


  1. MR 4 (4)
  2. SC 4
  3. SC 4
  4. SC 4
  5. SC 4
  6. SC 4
  7. SC 4
  8. SC 4
  9. SC 4
  10. SC 4
  11. SC 4
  12. SC 4
  13. SC 4
  14. SC 4
  15. SC 4
  16. SC 4
  17. F/O

Cape (make one, red yarn!  You will be working in rows for this, not in a circle. CH 1 and turn at the end of each row)


  1. SC 40
  2. SC 25
  3. SC 10
  4. SC 10
  5. SC 10
  6. SC 10
  7. DEC, SC 6, DEC (8)
  8. SC 8
  9. SC 8
  10. DEC, SC 4, DEC (6)
  11. SC 6
  12. DEC, SC 2, DEC (4)
  13. SC 4
  14. DEC, DEC (2)
  15. SC 2
  16. DEC (1) ***At this point, you will NOT turn.  Continue down the side of the triangle, to the side of the cape that only has on row on the cape tie - not the side with the thicker tie)
  17. SC down side (should be about 14 SC)
  18. SC 15 to thicken the "cape tie" and make it the same thickness as the other side
  19. F/O


Assembly

I usually start with the limbs, and work my way to the larger pieces!


For the hands and arms:  Take the forearm, and place the end without the tail down into the cuff of the glove.  I try to place it all the way down to where the yellow and red meet.  Take a bit of yellow scrap yarn and sew it into place.  Then you can fold the cuff of the glove down.

Next, take the shoulder piece, and sew the forearm top to the bottom of the upper arm.  You don't want these to overlap at all.  You want to do more of a whip stitch with them side by side to make a "joint" so his arm can bend.


For the boots and legs:  You should have previously sewn the boot cuff to the bottom of the boot, if not do it now as stated in the "boot" section above.  Now you can take a leg, and place the leg inside the boot as far as you can.  I place the end without a tail inside the boot, so I can sew the leg to the bottom later.  Using some black scrap yarn, sew two stitches to look like laces on the front of the boot "cuff", using these two stitches to hold the leg into the shoe.

Next, I usually sew the legs to the bottom before attaching them to the main body to make it a bit easier to handle.  The legs should go on either side of the rounded half sphere, on the bottom.  Once those are attached, sew the abdomen to the very middle of his bottom on the flat side


For the body: Sew the shoulders on either side of the body.  The body should have an oval shape, make sure the shoulders are on the narrow part of the oval, so the long side is his front and back.  .


For the head and cape:  Papyrus's head should go, of course, on top of his body.  I usually place the head a little farther forward instead of in the direct middle.  The cape is where it can be a little tricky. I center the back of the cape behind Papyrus' head on his back, and wrap one side of the cape tie around his neck and stitch it into place.  Then, I take the other tie, wrap it around and fold it under the other side and tack it down with a few stitches.


Lastly, his face!  You can needle felt it on, but I just used the regular craft felt I had lying around and some glue.  I just eyeballed it off a few Papyrus photos I found online.


And you're done!  I made both a "regular" and "flirty" Papryus face - I'm in love with them!!  Have fun making your own Papyrus!

This pattern is for personal use only, and is a fan made creation - not an officially licensed pattern. 


Thursday, October 6, 2016

Mushroom Scarf Pattern

I have seen versions of this scarf every where.  Some great, some... need a little guidance.  But I couldn't find any patterns that I actually liked what the finished product looked like.  So, I made my own!


Stay warm this winter with this cute, nerdy scarf!  If you need further explanation, I made a video tutorial.  Part one is underneath the instructions for part one, and part two can be found at the bottom!

For this, I used:

Red colored Red Heart Super Saver yarn
White colored Red Heart Super Saver yarn
Black colored Red Heart Super Saver yarn
yarn needle
3.75mm (size F) crochet hook
scissors

Mushrooms (make 12 - work in rows)
Begin with white yarn


1.       Ch 9, turn
2.       Start in 2nd chain from hook, SC 8, turn
3.       INC, SC 6, INC, turn
4.       SC 10, turn
5.       SC, DC 8, SC, turn – change to red yarn
6.       3 DC in the first SC, SC 8, 3 DC in the last SC, turn
7.       SC 14, turn
8.       SC 14, turn
9.       SC 14, turn
10.   SC 14, turn
11.   DEC, SC 10, DEC, turn
12.   SC 12, turn
13.   DEC, SC 8, DEC, turn
14.   DEC, SC 6, DEC, turn
15.   CH 2 on your hook, DEC into the 3rd SC, SC 2, CH 2 on your hook and DEC into last stitch (skipping 3)

16.   F/O with slip stitch


Outlining:

      Work with black yarn.  Begin at the bottom of the mushroom face in a corner and single crochet in black yarn around the entire border of the mushroom, crocheting your yarn tails into the border as you go.  I crochet two SC in the area where you did a DEC of 3 at the top.


The Spots:

Work with white yarn.  There will be whole spots, and half circle spots.  If you are doing a double sided scarf, like I did in the videos, you will need 24 whole spots, and 48 half circle spots.

Whole Spots:

1. MR 5
2. INC in every stitch for a total of 10 stitches
F/O leaving a tail for sewing on later


Half circle spots;

1. MR 3, turn and work in rows
2. INC in every stitch for a total of 6 stitches
F/O leaving a tail for sewing on later


Details (eyes and sewing on the spots)

Sew on the spots like the photo above shows.  The whole spots will be in the center of the red, one on the front and one on the back of each mushroom.  Simply sew using the yarn tail you left on the spot with your yarn needle.   Repeat the same process with the half circles, just placing them on each side of the whole spot, one on the front and one on the back for each side.  You will use a total of two whole circles and four semicircles on each mushroom if you are making it double sided.

Eyes:

You will use black yarn to embroider the eyes on.  I place the eyes between stitch 3-4 and stitch 6-7 on the double crochet white row, then weave the tails in.

Assembly:

All 12 of your mushrooms should be complete at this point.  They will go one on top of the other.  I do mine first in two rows of 6, then take the top mushroom of each group of 6 and sew the tops together (to make the two groups of six face opposite directions).  They will then always be right side up when you are wearing them. Just use your black yarn and sew them together!


Saturday, October 1, 2016

Roy Mustang Cosplay

So we attended Geekfest 2016 at Central Texas College last month, and it was a pretty good small show.  I have a few costumes for myself, but my husband usually just dresses in the NERDpillo shirts we had printed as a "uniform".  This time, he wanted to go as Roy Mustang from Fullmetal Alchemist: Brotherhood - and he let me know about a week ahead of time (ugh!).  But, I got it done!

For this cosplay I used:

10 yards of blue cotton fabric
One yellow iron-on patch
6 star shaped buttons
5 yards light iron-on interfacing
2 yards gray cotton fabric
10 yards yellow cording
Various gold, gray and silver round buttons
4-5 packs of gray bias tape
Elastic (for waist band - optional.  You can do a zipper/button if you want)
Ring from a keyring
Sculpey clay
Silver paint
Green, red, white, and yellow ribbon
cardboard
(optional for neck pins - soda can, print of pins on collar, safety pins, ball point pen)

I couldn't find any suitable patterns online to use directly for the uniform, so I knew I would have to draft my own.  I started with Simplicity pattern 1039, and decided I could alter it enough to work.


I used the pattern for the suit on the left for the most part.  I began with the jacket, since I knew that would be the most time consuming part.  I cut out the pieces for jacket A, trimmed it to the length of jacket B so it would be shorter.  
When I alter a pattern, I always trace the piece onto a large piece of kraft paper (I keep a huge roll on hand for such occasions). Then I alter the piece on the paper before I cut it out for use.  Not only do I have a stable piece for the fabric, but it can be used again and again and isn't made of that flimsy tissue paper that patterns come on.

I added a rectangle to the left front panel of the jacket at an angle, to make the fold in the front of the coat.  To be sure it worked, I folded the pattern itself, and resized until it worked how I wanted it to.

For the rest of the four panels of the coat, I didn't alter much.  I added interfacing to the blue cotton to give it the crisp uniform look, and lined it in the same blue cotton since I was pretty sure the coat is blue inside.  I completed the sleeves as directed in the pattern as well, but didn't hem them so I could add the cuffs later.

Here's the fun part where you learn from my mistakes!  I added the sleeves before adding the epaulets on the shoulder.  Sad, sad day.  But it was an easy fix (rip out a seam, add it in).  For the epaulets, I did a 2.5" wide piece of fabric the length of the shoulder to just under the neck seam, along the top of the shoulder.  I took two pieces of blue cotton that size, sewed them together on three sides, leaving a shorter side open, and flipped it.  For the yellow lines, I tried embroidering ribbon but it just looked terrible.  So I took a yellow iron-on patch, cut it into thin lengths, and ironed them on.  At this point, I placed the open end of the epaulet into the shoulder seam and sewed it into place.  Each shoulder should get 3 stars, and I secured the end closest to the neck with a gold button sewn through the epaulet and onto the shoulder of the coat.

For the sleeves, I measured the length from the wrist to a little under 1/2 of the elbow, and used that as the measurement for the cuff.  Don't make this a complete circle when you sew it on, because the sleeve does have a slit in the cuff (shown in the photo).  Once this is in place, use your bias tape to outline the cuff on both sleeves.  The same can be done for the collar, I measured a 5" high piece of blue cotton the length of the neck collar, cut this, used interfacing and lined it in cotton.  I then ironed it in half to make the fold in the collar, attached to the coat, and lined in bias tape.   This is a good point to line the rest of the coat in bias tape, as needed, including the "t" shapes on the breast of the coat.

The rope on the shoulder was impossible to find around my home without ordering it, and I didn't have the time.  So I simply took yellow cording I found in the dollar section of my local hobby store with the ribbon, and braided it together.  I took a piece of bias tape and made a loop with it, and sewed it to the middle of the "t" on the coat, then added a ring from my car keys that I wasn't using.  I attached the cording to the key ring, then attached it to the cording I placed around the shoulder and under the epaulet with hot glue inside of a piece of clay I made in the shape of a tube "t".  The clay was painted silver to make it look like metal.  At this point, I added the rest of the buttons onto the coat since it fit nicely.   I also had used velcro to keep it shut, but it didn't seem to be working as efficiently as I had hoped.  I sewed a few snap buttons on the inside of the coat instead.

For the belt and cape that goes around the waist, I had to create my own pattern from scratch.   I measured the length from the waist to about halfway down the calf, and measured the waist.  I wanted the belt part to be 1.5" the circumference of the waist, so it would overlap in the front.  I used gray cotton, as close to the color of the bias tape I could find.  I made the belt 4" high, so the fabric was 1.5 x waist circumference by 4.5" high (seam allowance!).  I cut two, used interfacing, sewed it together flipped it.  For the cape, I used the measurement from the waist to the mid calf, and measured the part of the waist the cape should touch.   If you look at the photo, the cape should go around the hips, but not close in the front.  I made two trapezoids out of the blue fabric, and made the bottom of them about 4" longer than the tops.  I sewed it together about 3" at the top in the middle, but not all the way down.  The cape is split in the middle.  Outline in the bias tape, sew it to the belt!  I also added snap buttons here to keep it in place, and added two large gray buttons at the front just as decor.

The pants were the easiest part.  I simply did the pants in the pattern, but made them a little larger in the thighs to make them "billow out" a little bit.  I kept them the original size on the calves, since the pants had to sit inside of boots.  I also didn't add a zipper or button on the fly, since my husband didn't want any of that.  We went for an elastic band placed inside the waist band instead.
The details were pretty easy, though I have to admit they were quick solutions that I will update later.  I used pieces of cardboard and ribbon for the ribbon the front of the uniform, and simply wrapped them around the cardboard and glued them in place.  I added a safety pin to make them stay on the uniform.  For the buttons, I wanted to order the official ones but there wasn't time.  I cut up a clean soda can, printed a photo of the buttons on Mustang's collar, and traced them onto the aluminum using a ball point pen.  This makes an impression on the aluminum.  Go over it a few more times with the pen, and you'll have good, deep impressions.  I folded the edges under to try to make it less sharp, added a safety pin, and that was that.  This method does make a SHARP edge, so please be careful.  They will definitely be replaced for the next show. 


We paired the uniform with the Roy Mustang gloves we got online (I was going to make them but he insisted), and a pair of boots we found at the local thrift store.  Ideally, the boots would not have laces and be pull on, but those seem impossible to find around here.  We make do with what we have!  His costume was a pretty big hit, and it rained that day so he had a lot of people marking snarky comments about how he's pretty useless in the rain.  It was great!